Thursday, January 25, 2018

Inserting data in custom list using javascript in SharePoint 2013


1. Create a SharePoint custom list : For an example such as below one


2. Create a javascript file and copy below code into that file.

function SaveVehicle() {

    var listName = "vehicleList";
    var newVINNumber = document.getElementById('txtVINNumber').value;
    var newVehicleYear = document.getElementById('txtVehicleYear').value;
    var newPlateID = document.getElementById('txtPlateID').value;
    var newCurrentMileage = document.getElementById('txtCurrentMileage').value;
   

    CreateListItemWithDetails(listName, _spPageContextInfo.webAbsoluteUrl, newVINNumber, newVehicleYear,
        newPlateID,newCurrentMileage, function () {
        console.log("New Item has been created successfully.");
    }, function () {
        console.log("Ooops, an error occured. Please try again.");
    });
}

function CreateListItemWithDetails(listName, webUrl, newVINNumber, newVehicleYear,
        newPlateID,newCurrentMileage, success, failure) {
    var itemType = GetItemTypeForListName(listName);
    var item = {
        "__metadata": { "type": itemType },
        "VINNumber": newVINNumber,
        "VehicleYear": newVehicleYear,
        "PlateID": newPlateID,
        "CurrentMileage" : newCurrentMileage
    };

    $.ajax({
        url: _spPageContextInfo.webAbsoluteUrl + "/_api/web/lists/getbytitle('" + listName + "')/items",
        type: "POST",
        contentType: "application/json;odata=verbose",
        data: JSON.stringify(item),
        headers: {
            "Accept": "application/json;odata=verbose",
            "X-RequestDigest": $("#__REQUESTDIGEST").val()
        },
        success: function (data) {
            success(data);
        },
        error: function (data) {
            failure(data);
        }
    });
}

function GetItemTypeForListName(name) {
    return "SP.Data." + name.charAt(0).toUpperCase() + name.split(" ").join("").slice(1) + "ListItem";
}

3. Add a "Script Editor" or "Content Editor" Web Part and Add this line of code on clicking of submit button
Include the javascript file which is in step 2 with script tag.

<button onclick="SaveVehicle()">Submit</button>


You can use "Developer Tools" of Browser or "Start Debugging" from Visual Studio to 

Thursday, November 16, 2017

How to get Managed Meta Data Service Information using PowerShell in SharePoint 2013/2016


If you want to get details about the managed meta data service application, there is only onw thing which you must have.

1. Central Adin URL
2. Access to Run "Windows PowerShell ISE"

There are 3 steps.

Step 1:
$site = Get-SPSite "http://tailspin.com:21332/"
Pass Central Admin Application URL as a parameter here to get site object.

Step 2:
$taxSession = new-object Microsoft.SharePoint.Taxonomy.TaxonomySession($site, $true)
To get the taxonomy Session for the Central Admin Site. Pass on Site object here.

Step 3:
$taxSession.TermStores
This step would give you all the information about "Managed Metadata  Service" Applications which are configured on this farm as of now.


Tuesday, October 3, 2017

Useful Powershell Commands in SharePoint 2013/2016


To Get the default search index location
 $ssi = Get-SPEnterpriseSearchServiceInstance
 $ssi.Components

It would show  the similar output in which the "Index Location" is the location of search indexes.

Id            : b16c2902-7546-4580-aac8-49ddc822eef5
ServerName    : contoso.com
IndexLocation : C:\Program Files\Microsoft Office Servers\15.0\Data\Office Server\Applications
State         : Ready
DesiredState  : Ready


Clearing all indexes from Search Service Application
 $ssa=Get-SPEnterpriseSearchServiceApplication -Identity "Search Service Application"
$ssa.reset($true,$true)
Where,$True parameter denotes: Disable Alerts & Ignore Timeout error. 


Setting Global Search Center URL in Search Service Application
$ssa=Get-SPEnterpriseSearchServiceApplication -Identity "Search Service Application"
$ssa.SearchCenterUrl = "
http://contoso.com:44494"
$ssa.update()


Changing the master page on SharePoint sites with PowerShell
web = Get-SPWeb http://portal/sites/collaboration
$web.MasterUrl = "/sites/collaboration/_catalogs/masterpage/custom.master"
$web.Update()
$web.Dispose()


Start the upgrade process on a site collection
Upgrade-SPSite http://<site name>/sites/testsite -VersionUpgrade


Exports a site, list, or library.
Export-SPWeb http://site -Path "site export.cmp"

Import a site, list, or document library in SharePoint 2013
Import-SPWeb -Identity  <SiteURL>  -Path <ImportFileName>

To Convert the authentication mode of a web application
 Convert-SPWebApplication -Identity "https://<webappurl>" -To Claims -RetainPermissions [-Force]


Upgrades a deployed SharePoint Solution
 Update-SPSolution -Identity contoso_solution.wsp -LiteralPath c:\contoso_solution_v2.wsp -GACDeployment


To Install a SharePoint Hosted App in a site
$spapp=  Import-SPAppPackage -Path Path to app -Site URL -Source Source
Install-SPApp -Web URL -Identity $spapp


To Change the visual Elements of Site collection from SharePoint 2010 to SharePoint 2013
Upgrade-SPSite http://<site name>/sites/testsite


Setting up a new URL for existing site collection in web app
Set-SPSiteURL -Identity $site -Url http://contoso.sharepoint.com -Zone Default


To change the ContentType Hub URL in "Managed Metadata Service" Application
Set-SPMetadataServiceApplication -Identity "NYCEDC MMS Application" -HubUri "http://contoso.com:45518/sites/ContentTypeHub/"


To set the interval for creating ULS Log File
PS C:\Users\contoso> Set-SPDiagnosticConfig -LogCutInterval 60

To set the days interval for keeping the ULS log Files.
PS C:\Users\contoso> Set-SPDiagnosticConfig -DaysToKeepLogs 5

To create  a new Managed path under a web application
New-SPManagedPath "applications" -WebApplication http://contoso.com:44495


Friday, September 22, 2017

Verification Failed: URL is not a valid routing destination

Configure Send to Connections :  Error-Verification Failed: URL is not a valid routing destination


The Document Center URL is this.
http://<<Server Name>>:45518/sites/DocumentCenter

Added "/_vti_bin/officialfile.asmx" into the above URL to make "Send to URL" which need to input while configuring "Send to Connections".

Now While configuring a "Send to connections" in "general Application Settings" on Central Admin of SharePoint 2013, 


 To remove this error you have to go to "DocumentCenter" Web Application mentioned in above URL Choose "Site Actions" | "Site Settings" | "Manage Site Features".

Activate "Content Organizer" Feature. After activating verify that the feature was really enabled. Under "Site Administration" there would be "Content Organizer Settings" menu entry should be there.


 Now Again click "Click Here to Test" in "Send to URL". Now It would show "Verification Successful".


Tuesday, May 2, 2017

Getting i:0#.w| as a prefix in emails In Nintex Workflow for sharePoint 2013

Getting i:0#.w| as a prefix in emails In Nintex Workflow for SharePoint 2013

I am using SharePoint 2013 and Nintex workflow.  When any email is received through Nintex workflow, the People names are displaying like this : i:0#.w|domain\name..

1. To fix this issue, you would need to create a "Workflow variable" of  type "Single Line of text".


2. After that add a new action of "Regular Expression" from "Insert Action" > "Operations" > "Regular Expression" before any " Send notification" Step.


3. Now Configure this "Regular Expression" Action.


The pattern which you have to use is : i:0#.w[|]


You need to specify name of "workflow variable" in "Store Result In" Section  which you created in step 1.

After that you can use the same variable in "Email Notification" Configuration Section.


 Now the full Name would be displayed of the Person.

Friday, March 17, 2017

Configuration Error : web.config ConfiSource


Everything on my end was working fine and suddenly I faced this issue while hitting my SharePoint Application. This was the below error which I was getting while hitting the app.


After going through some of the forums I got to know that one extra line has been added somehow in <appSettings> for key. When I removed this line, I was able to hit my application without any issue.


Incorrect:
<appSettings configSource="AppSettings.config">
<add key="aspnet:UseStrictParserRegex" value="true" />
</appSettings>


Correct
<appSettings configSource="AppSettings.config">
</appSettings>


Friday, December 30, 2016

SharePoint 2013 Search Provisioning

SharePoint 2013 Search Provisioning

 
 SharePoint 2013 Search Overview


In SharePoint 2013, there are numerous components in Search Topology:
  • Search Admin Component
  • Index
  • Crawler
  • Content Processor
  • Analytics Processor
  • Query Processor


Enterprise Search Life Cycle

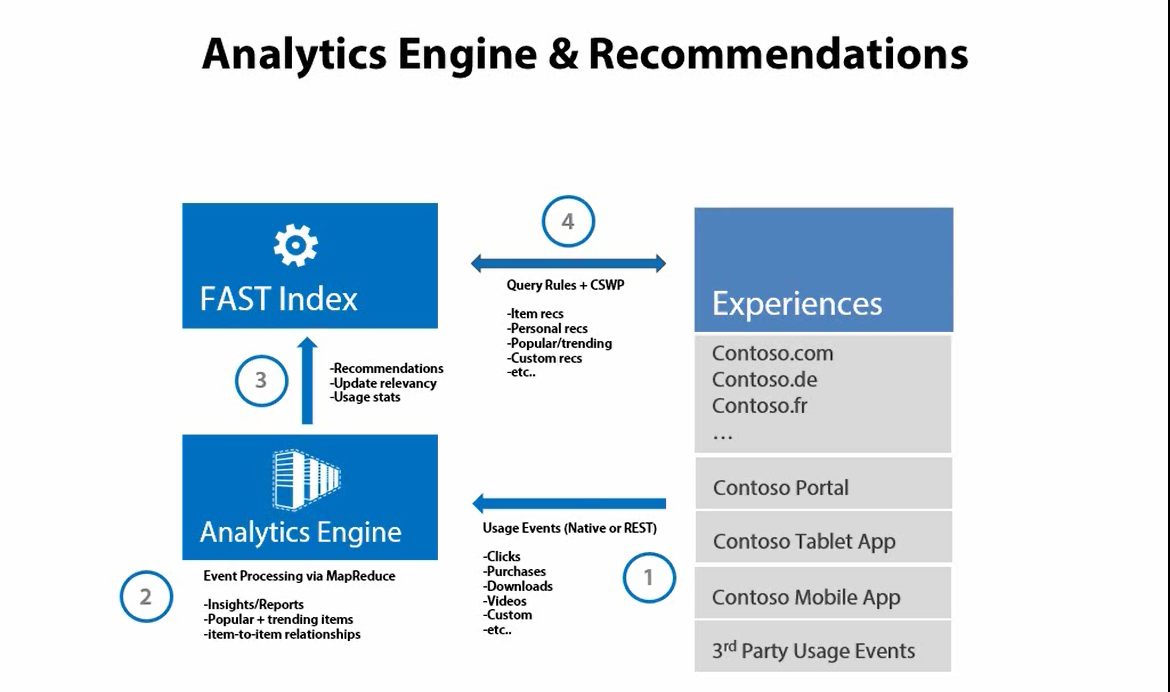
Content Processing


Analytics Processing

Planning and Deployment


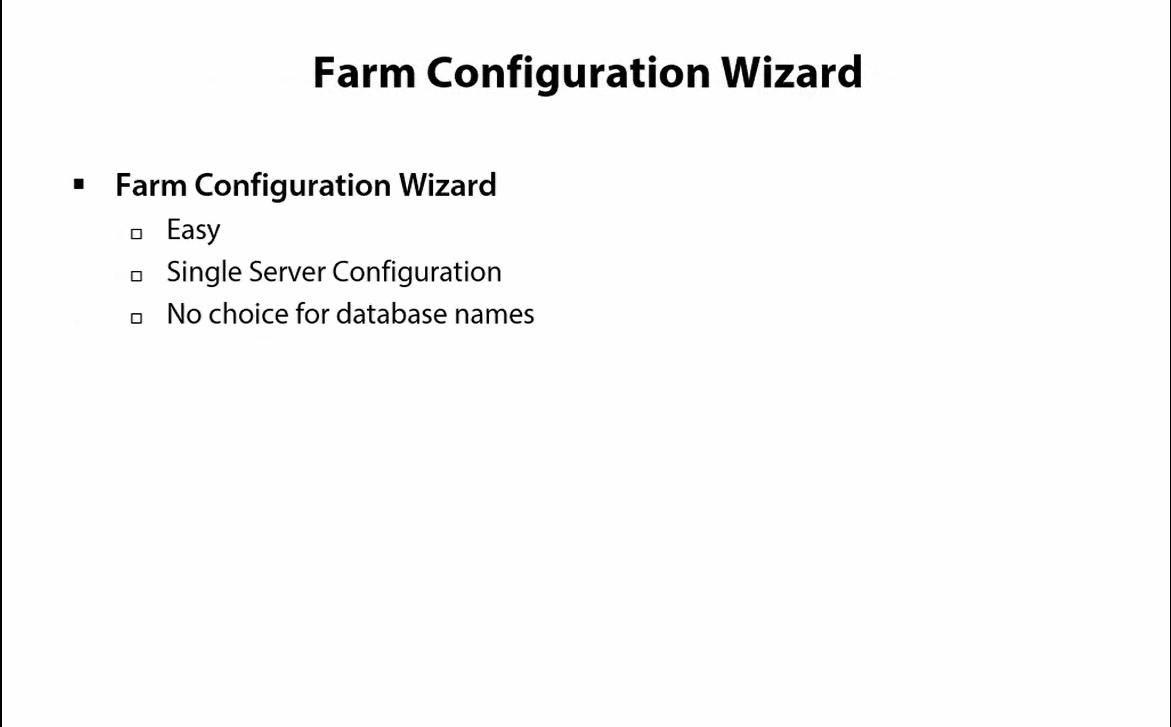
Farm Configuration Wizard - Pros/Cons


Central Provisioning  - Pros/Cons


PowerShell Provisioning  - Pros/Cons


Thursday, December 29, 2016

Crawled Propeties Name in SharePoint 2013


Crawled Properties Name in SharePoint 2013


SharePoint List Column : ows_ColumnName

SharePoint Site Columns : ows_q_<4 letter code>_ColumnName

Managed Metadata : ows_taxId_ColumnName

HTML or Multiline Test : ows_r_<four letter code>_ColumnName

Profile Properties : People:InternalName

BCS properties: Entity_FieldName


Automatically Created Managed Properties


Wednesday, November 2, 2016

Delete a SharePoint 2013 Subsite

Delete a SharePoint Subsite
  1. In your web browser, open your SharePoint site.
  2. Navigate to the subsite you want to delete.
  3. Click the Settings button (Gear icon), and then click Site settings.
  4. Under Site Actions, click the Delete this site link. Click to view larger image. ...
  5. Click Delete to confirm the deletion.

Wednesday, October 12, 2016

Office Web App in SharePoint 2013

Document Preview in SP 2013
View in browser
Office Web App Server Overview
Office Web Apps Server is a new Office server product that delivers browser-based versions of Word, PowerPoint, Excel, and OneNote. A single Office Web Apps Server farm can support users who access Office files through SharePoint 2013, Lync Server 2013, Exchange Server 2013, shared folders, and websites.
Office Web Apps (OWA) is no longer a set of SharePoint Service Applications, and the deployment of a separate OWA farm is necessary.


General Guidelines
  • To minimize the complexity of the deployment, install all office web apps roles on each server instead of distributing the roles on servers.
  • Office web Apps 2013 does not require SQL database.
  • PowerShell is used to define Office Web Apps topology, by using New-OfficeWebAppsFarm command with the master server (the first server in the farm) and by using New-OfficeWebAppsMachine command to join more machines to the farm.
  • Also PowerShell commands are used to connect the SharePoint farm to Office Web Apps farm.
  • In case of installing updates and patches , the Office Web Apps server should be disconnected from the Office Web Apps farm then joined again after finish the patching.
  • SharePoint system account cant render office web apps (by design for security)
  • NLB Tips
    • Consider using NLB for high availability
    • Make sure to enable NLB server affinity
Prerequisites

Best Practice(s)
 Servers that run Office Web Apps Server must not run any other server application. This includes Exchange Server, SharePoint Server, Lync Server, and SQL Server. If you have hardware constraints, you can run Office Web Apps Server in a virtual machine instance on one of these servers.
  • Don’t install any other server applications on the server that’s running Office Web Apps Server
  • Do not install any services or roles that depend on the Web Server (IIS) role on port 80, 443, or 809 because Office Web Apps Server periodically removes web applications on these ports
  • Do not install any version of Office. You must uninstall Office before you install Office Web Apps Server.
  • Don’t install Office Web Apps Server on a domain controller.
  • Make sure all SharePoint 2013 web applications use claims-based authentication. Office Web Apps rendering and editing won’t work on SharePoint 2013 web applications that use classic mode authentication

Next Steps after installation
After installation, we need to run following cmdlets to create OWA Farm.
  • New-OfficeWebAppsFarm –InternalUrl “http://OfficeApps” –AllowHttp –EditingEnabled – To create new OWA Farm
  • New-OfficeWebAppsHost -Domain  - To Add your domain to the list of allowed hosts.
  • New-SPWOPIBinding -ServerName <WacServerName> -AllowHTTP    -  Configure a connnection between SP Farm and OWA Farm
  • Set-SPWopiZone –zone "internal-http"   – To set the zone
  • Set-OfficeWebAppsFarm –EditingEnabled – Enabling Edit in Browser
  • Change the AllowOAuthOverHttp setting in SharePoint 2013 to True
  •  
Limitations:
1.       Only Supports Microsoft office Documents (Microsoft Office Word, Excel, PowerPoint, or OneNote document).
2.       In order to enable this preview functionality, you must have a separate Farm. ( Extra Server(s))
3.       Not very lightweight as every document to be converted for each preview.
You installed the March CU for Office Web Apps 2013 (WAC) which supports rendering PDF files
File previews in SharePoint 2013 are handled by the script filepreview.js, and this script has not yet been updated to handle PDF files. You could either edit the file manually, which we know we should stay clear of, or add the following script snippet somewhere to be loaded on your page.
?


SP.SOD.executeFunc('filePreview.js', null, function () {
    embeddedWACPreview.dimensions["pdf"] = embeddedWACPreview.dimensions["docx"] ;
    filePreviewManager.previewers.extensionToPreviewerMap["pdf"] = filePreviewManager.previewers.extensionToPreviewerMap["docx"] ;
} );

What the script does is copy the registrations for Word document previews, and attaching it to the PDF file extension. Good places to add this would be your master page, a script file always included on all pages or similar.
Planning of OWA Server

Prepare servers to run Office Web Apps Server


Hardware Requirement
Office Web Apps Server uses the same minimum hardware requirements as SharePoint Server 2013. You can find the full set of SharePoint 2013 requirements


Downloads, Server Roles and Features for OWA Server


Add more Office Web Apps servers to the farm

All what you have to do now for any additional office web server is to:
  • Install Office Web Apps pre requisites
  • Install office web apps
  • Join the new server to the NLB Cluster (as described above)
  • Run the following windows power shell command from a machine that is already part of the farm
  • Firewall: If the machine joining the WAC farm cannot access the HTTP 809 channel the New-OfficeWebAppsMachine will throw a “The destination is unreachable error”.
New-OfficeWebAppsMachine –MachineToJoin ServerName
ServerName: is the name of the master machine (the first machine you added to the farm)
use the below command to make sure the new server is added to the farm
Get-officeWebAppsFarm

Remove Office Web Machine Server

On the server you want to remove run the below command:
Remove-OfficeWebAppsMachine
Tip: If, for any reason, you want to disconnect SharePoint 2013 from Office Web Apps Server, use the following command example:
Remove-SPWOPIBinding –All:$true


More Useful Links